With the opportunities to work or do business online, writing valuable content for a website, or SEO Writing, is one of the most important skills you should learn.
In this article, we will do the basic elements of writing for the web. And when you feel confident, you can even be part of this awesome writing team and earn.
Even if you feel you are not for an online business, SEO Writing is one of the most sought-after skills today because of the value of good content. It remains to be one of the ranking factors in Google, and knowing the SEO Writing rules will get you results like these which clients will willingly pay for.
Table of Contents
Basic Elements of SEO Writing
Since we are learning writing for the web, let me say SEO writing is not complete without reference to the most popular website builder or CMS which is WordPress. Hence we will start writing at the admin end of a WordPress site.
To those new to WordPress, do you need an actual WP website to practice? Not at all! You can have a local WP site, or a practice site, in other words, a site that only you can see.
To install WP on your PC, please check the WordPress article. You need not go through the whole WP site-building.
The only thing you need for the purpose of SEO writing is to install the local WP site on your pc.
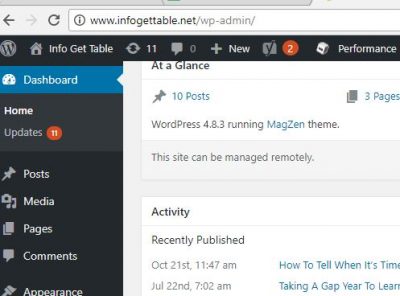
Next, you need to login to the backend of the simulated website. It looks like this:
After completing this task, we need to have a feature that will guide you as you write your article. With this, you need to install the Yoast plugin.
Install Yoast
On the Left Menu, go to Plugins > Add New > Search the Yoast SEO plugin. Click Install>Activate.
What does Yoast do?
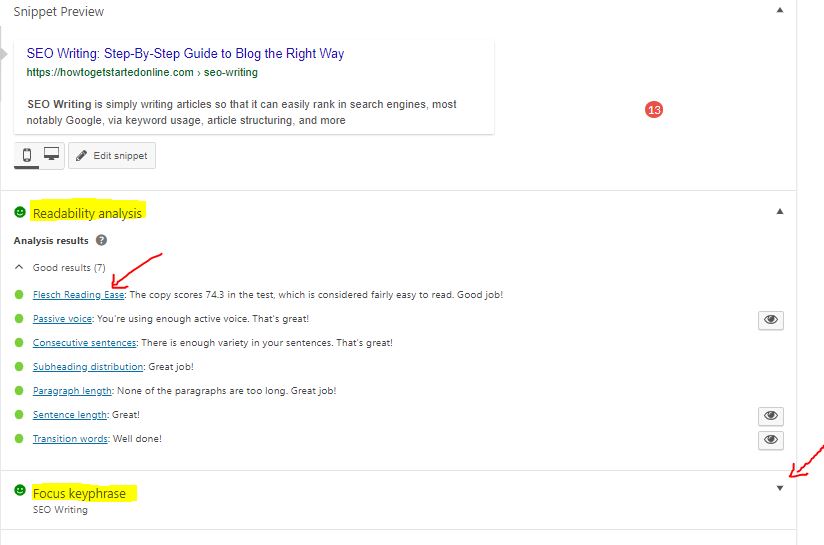
When you have installed and activated Yoast, you will see the guide below the Post or Page area and see green or red warnings as you write, with green meaning okay.
Please do take note that Yoast is just a guide so that you do not overuse your keyword, you do not have very long sentences, and so on. In the end, it is all about user experience!
Now you can start typing in your article in your local WP by clicking on Post and then Add New.
(Please note that this tutorial used the Original Classic Editor of WP. The default editor now is Gutenberg which is different from the screenshots here. To get back the original Classic Editor:
- go to Plugins>Add New
- then search for the Classic Editor plugin
- Install the plugin and click Activate.
More on the Gutenberg editor coming soon)
Another emerging SEO Writing guide is the Rank Math plugin which is also very good. We are using Yoast as an example because millions of sites use it already.
Add Focus Keyword/Keyphrase in the Post Page
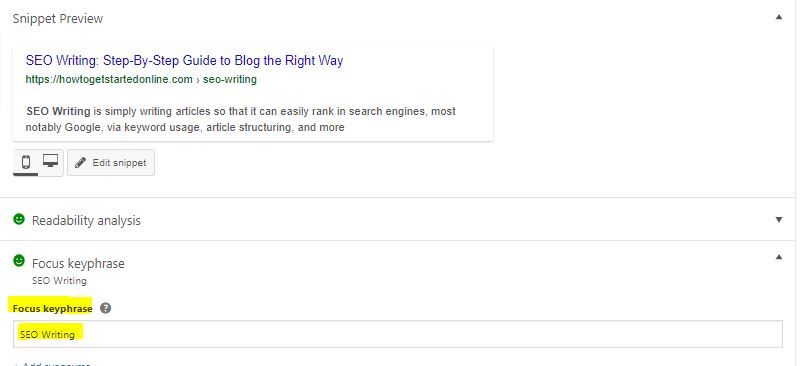
Scroll down the Post page you are on, and you will see the Focus Keyword. Type your focus keyword there. In the sample below it is SEO Writing
Edit Snippet
In SEO Writing, the snippet is your SEO Title and Meta Description, and a view of how your article will be indexed in search engines.
It is also what will appear when anyone uses the social sharers of a website. Hence it is very important. If you go beyond the character count, it will appear in search engines in an ellipsis (….).
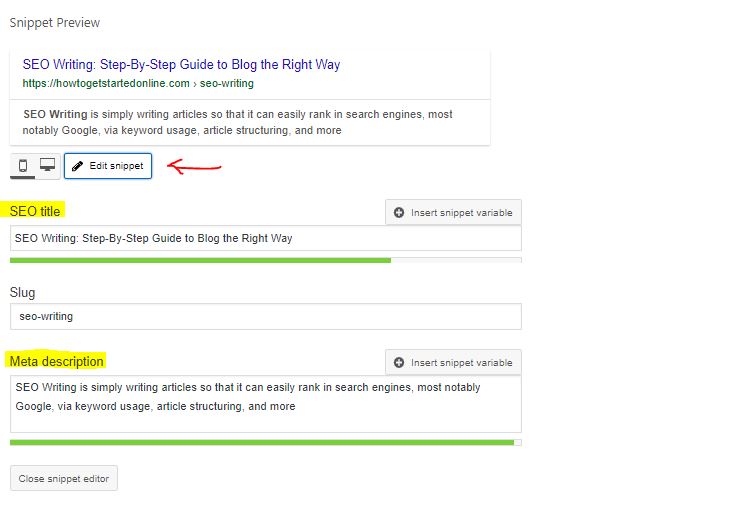
You will also see “Edit Snippet” above the Focus Keyword. Click it open and type the SEO Title (the title of your article as it will show in search engines.
SEO Title need not be the same as your article title. Maximize the space allowed for the SEO title by adding more KWs (60-70 characters estimate).
The length of your SEO Title is enough when it shows a green bar. Make sure your focus KW is in the SEO Title.
60-70 characters estimate?
I said ESTIMATE because the SEO Title (also known as meta title) in particular is measured by Google in pixels, between 466 and 469 pixels.
A way for you to check if your title is going beyond the viewable limit is through this Google Snippet Optimization tool.
For the meta description, write a short description of the article, about 156 characters. Make sure your focus keyword is also in the meta description. Like the meta title, the bar below it turns green when the length is enough.
Update as of March 2019: If you do not write a meta description, Google will either get the first 156 (more or less) characters of your article OR get a relevant meta description based on a searcher’s query.
I will not write every rule for SEO Writing here as the Yoast plugin will guide you. The purpose of Yoast is a guide as to some good layout but do not be obsessed to get it all green. As I said, it is all about user experience! Below are the basic rules.
Starting The Content
1. Keyphrase and Purpose of Content within the first 100 Words
Your keyword must be present within the first 100 words and the first paragraph must be direct with what your topic is about, what problems you intend to solve, or the purpose of that article. No fluff.
To get ideas coming from your main keyword, type it in Google, get the top articles on the first page, and start writing by planning the outline of your topic and rewriting in your own words.
Never EVER copy-paste or simply rephrase line by line.
2. Use People Also Ask
You can also sometimes see this section:
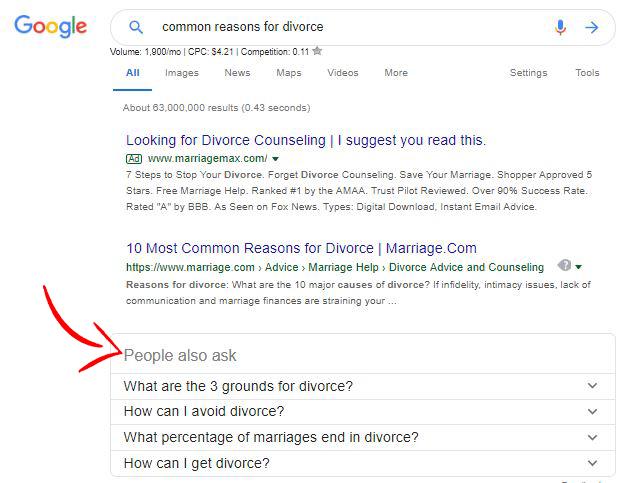
The “People also ask “is a good section to get ideas. Use these questions in subheadings.
3. Use Answer The Public
Answerthepublic.com gives you tons of content ideas once you type the keyphrase in the field. Though it is free, you can only customize your searches according to the location under the paid plan.
Use Subheadings
Use subheadings to break the monotony of continuous paragraphs. Having a paragraph that seems continuous with no breaks is boring and may make a reader leave your site.
Hence, break your paragraphs to about 1-3 sentences each and use subheadings. You can see this by clicking on the arrow of the Paragraph box just above the writing field.
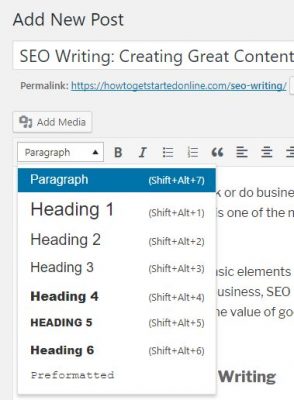
SEO Rule: Your article must only have ONE Heading 1, which is your main topic.
Then you can use Heading 2, 3, 4 to layout the article according to its proper hierarchy.
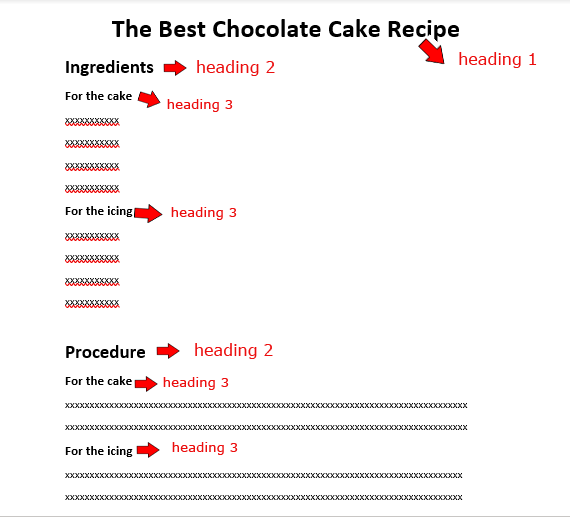
Headings are also a good place to put keywords or related keywords.
Add Images and Videos
Images, as we all know, break the monotony and make your article more interesting and engaging. It is easy to add images by clicking Add Media just below the Post’s title. It will lead to your site’s Library.
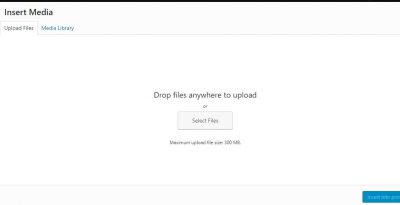
If the image is not yet in there, click the Upload Files tab on the left of the Media Library tab, then you can either drag the image from your PC to the middle of the Upload field or click Select File, then click Insert Into Post.
It is important to optimize your images. You can do this with a plugin or you can compress the images before uploading. Image compressing /pdf compressing can be done through compresspng.com, compressjpeg.com, and shrinkpdf.com
When you insert an image in a post, MAKE SURE you have also typed your keyword in the Alt Text field. SEO writing is never complete without it. In effect, you are embedding a relevant keyword into the image.
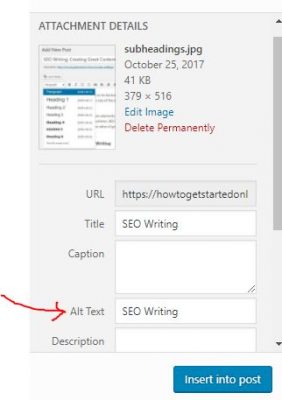
Why is this so?
Google cannot read images but can pick up the Alt Text of the image. And yes, Google also indexes your images. This can also lead readers to your website.
How?
When internet users are searching online in Google for a particular image using keywords and those keyword happens to be the Alt Text of your image.
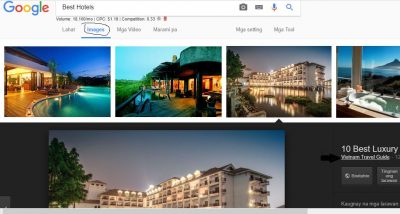
Take a look at the sample below when I searched for Best Hotels in Google and I clicked the Images tab (Google’s index or library) of images.
When I clicked on one image I like, the link to the website where the image came from was there “Vietnam Travel Guide”. Clicking on that link now converts to a website visit.
Where to Safely Grab Images
Important tip: DO NOT just grab any image on the web. – you might get sued for copyright. To play safe, you can get images from any of the following, largely free for commercial and non-commercial use:
(1) Pixabay.com
where all images are free. (The top of each Pixabay page has images from Shutterstock, those are for sale and protected by copyright too!).
(2) Unsplash.com
All the images on Unsplash are free for commercial and non-commercial use. You can also alter the images without needing to credit the photographer.
(3) Foter.com
Some photos are free for commercial use, or for modifications too, while some are not. Make sure you follow the requirement for attribution or credit for every photo.
(4) Pexels.com
All photos from Pexels are free for commercial and noncommercial use. You can even modify the images. Credit to the photographer is not necessary but always appreciated.
(5) Splashbase.co
All images are free under Creative Commons 0.0 (CC0) license, meaning no attribution is required.
(6) Giphy.com
Giphy is a source of GIFs or animated images. You can add them to your posts in the same way you add videos.
You can also do the same for videos (just click Add Media).
Source for Free Videos
Just click on any of the links below for free videos
(1) Pixabay
Videos are completely free under Creative Commons 0 (CC0) license, thus, attribution is not required.
(2) Pexels
As with Pixabay, videos are completely free under Creative Commons 0 (CC0) license, thus, attribution is not required.
(3) Videvo
You can filter the license of the videos whether needing or not needing attribution.
(4) Splashbase.co
They are free though attribution/credit is required under Creative Commons 3.0 license.
Seo writing is not just about putting your content and adding a lot of images or videos. To optimize user experience, make sure your images and videos are small in size to have a fast loading page.
That being said, remember to reduce the size of your videos first before uploading by using free software, handbrake.fr. This is important to make sure your page still loads fast. Other video compressing software include:https://www.onlineconverter.com/compress-video or https://www.freeconvert.com/video-compressor
Videos are very important to add to your posts. They engage website visitors to stay longer on your website which is another element that Google measures.
Embedding Videos
When you want to add videos, the fast way to do this is by getting the video’s EMBED link.
In FB it is on the top right of the post:
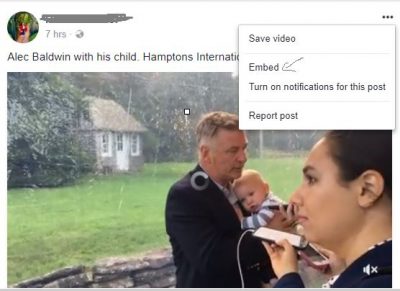
In Youtube, click the Share on the bottom right corner:
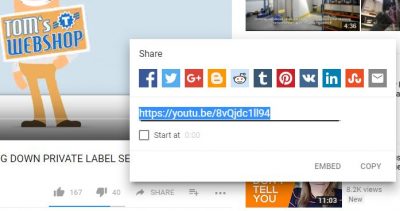
Click on EMBED and copy that script:
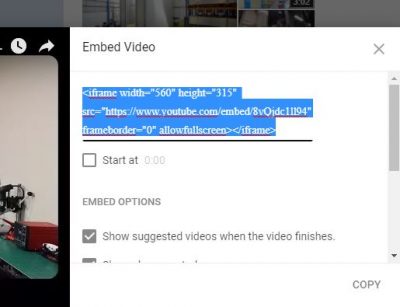
Next, on your WP post page, on the upper right of the writing field, you will see a Visual and Text tab, click on Text:
Paste the embed script

Then go back to the Visual tab, and you will see the video is embedded.
Note: like the images, do not just upload a video, there are some videos with copyright. It is best to contact the video owner as well as acknowledge the video owner via credits.
If you are uploading your video from your pc, you need to compress the video to improve page loading speed. Handbrake is one of the best video compressing software which will not affect the quality of the video.
Internal and External Links
When we read articles sometimes there are words that are clickable that will lead you to another page or site. These are called links.
Links are when you connect your post or page to another, whether to other pages within your website (internal link). or another website (external link).
Importance of links
- introduce your readers to other pages of your site, making them stay longer
- links are followed by search engines (unless you tag it as nofollow) so it helps them discover and crawl your other pages
- put your affiliate links (this will be explained in the Online Business Models page)
- add value to your post by citing other authoritative sites especially when you do not want to write about it anymore and just refer them to another site that has that information.
Adding links: The Use of Anchor Texts
- with your mouse or touchpad, highlight the word that you want to be clickable (this is the anchor text, this also matters in SEO); the anchor text must be relevant to the link you are putting. (So many people make the mistake of putting “click here” or “read more” as anchor text)
- click the chain icon on top of the writing field: copy-paste the URL of the page or site you are associating with that clickable word. Then click the gear on the right (very important!)

When you click the gear, this will appear next: whether it is an internal or external URL, always check the Open Link in a New Tab.
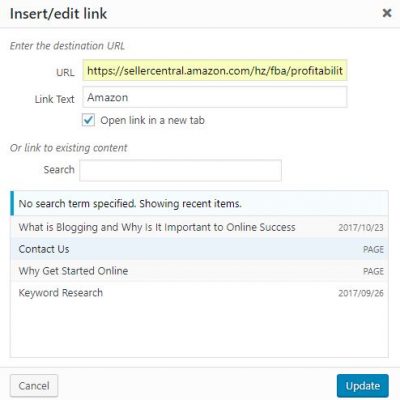
Why is this very important?
If you do not check the “Open Link in a New Tab” when the reader clicks on the link, the reader will be led to the other link and if it is an external link, in effect, the reader has just left your site – bad for SEO.
One final tip on creating links: for external links, as much as possible, make them in the lower half of your article – you don’t want your readers distracted by another site just when the reader is starting to read your post, do you?
SEO Writing tips from SEO gurus
To complete your SEO Writing tips here is what SEO experts found.
Based on their studies:
- Longer articles tend to rank higher in Google. Top ranking articles are into thousands of words. Now that will get boring: so here are the tips
– Keep it to 1-3 sentences per paragraph.
-Install a Table of Contents plugin. This will let a reader go to a particular topic within the article that he / she is searching for.
– Use subheadings
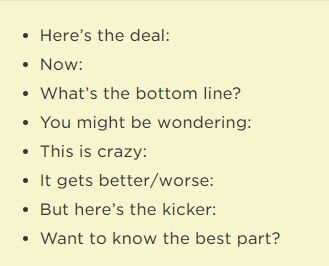
-Use the old school method of Bucket Brigades.
What? Bucket Brigades?
Bucket Brigades are one-liners you put in between paragraphs to lead your readers from one paragraph to the next, to break the monotony and sustain the interest of readers. For example:
- For titles, the powerful ones cite lists, use brackets like 10 Best Hotels [2017]
- The most attractive phrases to use in Titles are
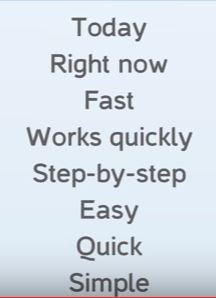
- I have also read that “Reviews”, “Free” are attractive to readers and for obvious reasons.
- Using brackets on your titles and title tags also helps according to a new post by Backlinko, such as
(Updated)
[Interview]
[X% Off]
[New Research]
(Case Study)
(New Guide)
[+Checklist]
(With Examples)
[Video]
(Trusted by X Clients)
[Flowchart]
[Visual Guide]
(No Fees)
[Template]
Conclusion
End your blog post/article with a summary. You can even add a question, encouraging them to comment for more reader engagement.
Publishing
When you have written enough material, you always have the option on the right to Save Draft, Preview, or Publish. You also have the following options:
- Status: clicking the Edit will show a choice of Draft, Pending, or Published.
- Visibility; clicking the Edit will show a choice of Public, Private, or Password Protected (in case you want to limit a certain post or page to a limited people whom you will give the password)
- Revisions: clicking the Edit will show the previous edits to the article or page, e.g. when you deleted a paragraph by mistake and want to retrieve it.
- Publish: publish now OR schedule the publishing at a future date, by clicking “Edit” on the “Publish on….”
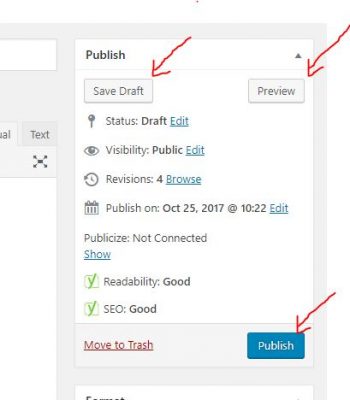
Now before you hit that Publish button on the right, make sure that you keep your URL (permalink) short and sweet. It is best to edit it before publishing.

You can edit it after publishing, but you should make sure you use 301 Redirects so as not to get a 404 error (Nothing Found). 301 Redirects is necessary when you change the permalink of a published article. You must redirect from the old link to the new.
This can be done by installing a 301 Redirect plugin (Search a compatible one). Once installed and activated, look for the Redirect feature on the left, or go to the Settings to look for the Redirect plugin. Here is a sample screenshot of what you will do:
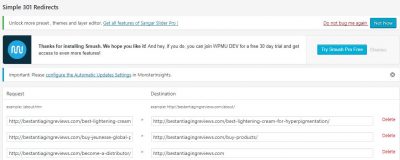
The old permalink is on the left, and the new permalink goes to the right. Then click Save.
In Summary
Content is king indeed as it remains to be one of the most important, if not the most important factors in ranking. Remember though that above anything, it is the user experience that matters most! Create great user experience and apply these rules and you are on your way to blogging success.
Do you feel you are ready to apply the rules of SEO Writing and want to earn writing? Then please do send a message through the CONTACT Form.
Now that you know SEO Writing, let us now move to the next level by building your blog with the most popular website builder – WordPress.

Great article! helps me to understand SEO more! I went in right away to make sure that I have alt text, I realised that it has been automatically added. Does Yoast do that for every product page?
Apologies for the late reply and thank you for the positive comment. Make sure that it is the Alt Text that is added which is different from the Image Title above it. Yoast does not add the Alt Text automatically.
This article is helpful!
Thank you Mary Rae, hope it launches you to a sought-after SEO writer – you can do it! 🙂
Just have started my first site and as you can see faced a problem with SEO optimization. Which tools could you recommend to analyze pages? For now, i have tried trial version of Plerdy Seo Checker and Screaming Frog Seo Crawler (my website has 12 pages currently) and they`re a bit complicated for me.
Apologies for the late reply, I did not get a notification. Ubersuggest is a good tool to begin with. 🙂